
Trimming your own hair at home can sound intimidating, but doing a basic refresh between salon visits doesn’t require a cosmetology degree. Whether you’re trimming split ends, dusting long layers, or refreshing your fringe, successful DIY hair cutting comes down to proper tension, sharp tools, and conservative adjustments.
The biggest mistake beginners make isn’t cutting unevenly—it’s using the wrong scissors or cutting off too much length at once. Dull household scissors bend and crush the hair shaft, leaving frayed ends that split faster than before you cut them.
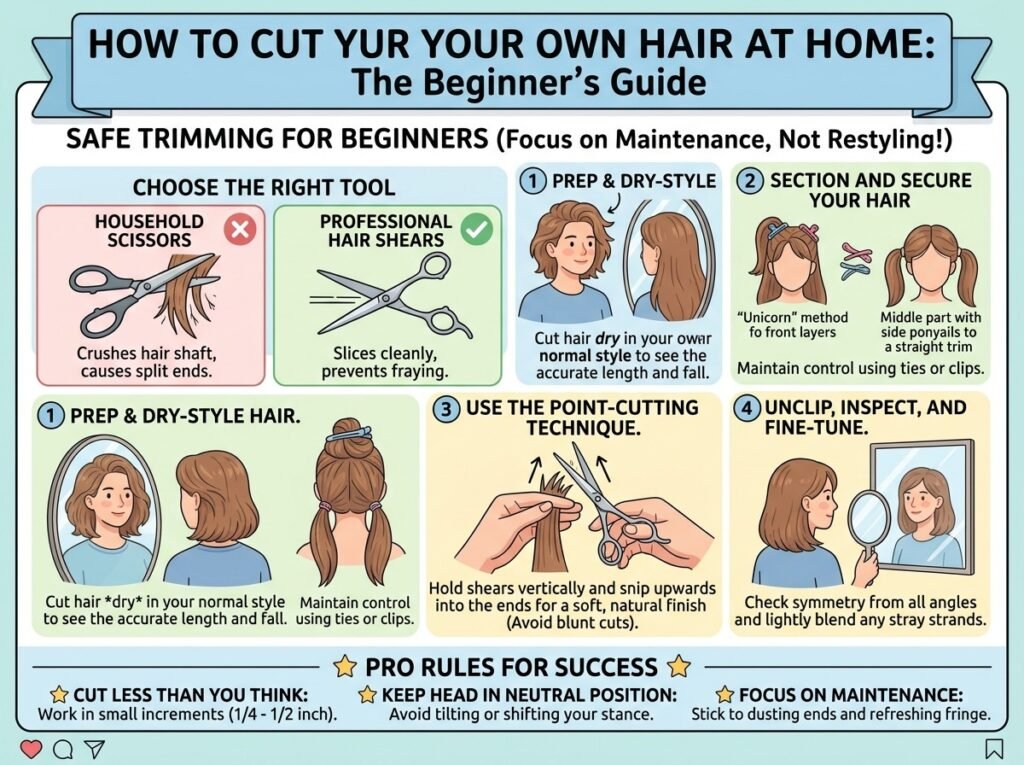
Household Scissors vs. Professional Hair Shears
Before taking your first snip, ensure you have the correct tool for the job:
| Tool Feature | Standard Kitchen / Craft Scissors | Professional Hair Shears |
| Blade Edge | Beveled, duller edges designed for paper/plastic | Convex, razor-sharp edge designed for hair fibers |
| Hair Shaft Impact | Crushes strands, causing instant micro-split ends | Slice cleanly through hair without fraying |
| Control & Precision | Heavy, bulky blades that slip easily | Lightweight, ergonomically balanced for micro-snips |
| Recommended Use | Never use on hair | Essential for all at-home trims |
Step-by-Step DIY Home Hair Cut Procedure
- Prep & Dry-Style Hair:
Ensures natural texture and length fall accurately. Wash, dry, and style your hair as you normally wear it. Cutting dry hair allows you to see the exact length, curl pattern, and fall in real time, preventing the dramatic shrinkage that occurs when wet hair dries.
- Section and Secure Your Hair:
Maintains control and prevents uneven chops. Divide your hair into manageable sections using non-damaging hair ties or clips. For long, layered hair, gather strands forward into a centered front ponytail (the popular “Unicorn” method) to create soft, cascading layers, or part down the middle into two side ponytails for a straight trim.
- Use the Point-Cutting Technique:
Creates soft, natural ends rather than harsh, crooked lines. Slide your hair tie down to your desired trim length (start conservatively with just 1/4 to 1/2 inch). Hold your hair shears vertically or at a slight 45-degree angle—never horizontally—and snip upwards into the ends. Point cutting softens the baseline and hides minor unevenness.
- Unclip, Inspect, and Fine-Tune:
Checks symmetry across both sides under natural light. Release your hair from the ties and comb it out completely. Tilt your head to natural resting positions and check both sides in a double mirror setup. If a few stray strands linger, lift those specific sections and point-cut the very ends to blend seamlessly.
Pro Rules for At-Home Hair Maintenance
- Cut less than you think you need: Remember that you can always trim more off later, but you can’t put chopped length back. Work in tiny increments (1/4 inch at a time).
- Keep your head in a neutral position: Avoid tilting your head down or sideways while snipping; shifting your stance changes how the hair falls and creates uneven layers.
- Focus on maintenance, not complete restyling: Save major chops (like going from waist-length to a chin bob) for professional stylists. At home, stick to split-end dusting, bang trims, and light layer maintenance.
Explore more beauty guides: Hair Styling & Haircuts