
Snapping a fresh nail extension is frustrating, but a break doesn’t have to mean filing down the rest of your set or rushing to the salon for an expensive emergency appointment. Whether it’s a hairline crack across the stress area, a lifted edge, or a complete break right down to the natural nail bed, you can repair extensions safely at home.
The secret to a durable repair lies in selecting the right fix for the specific type of break while protecting your natural keratin underneath.
Assessing the Break: Matching Method to Damage
Before applying glue or builder gel, inspect the break. Fixing a clean tear requires a completely different approach than treating a bleed or deep crack.
| Type of Break | Visual Symptoms | Best Fix Method | Ideal Repair Product |
| Hairline Crack (Stress Line) | Faint crack across the stress arch; extension is intact | Reinforced Patch Method | Silk wrap or tea bag + nail glue |
| Clean Snap (Tip Intact) | Extension snapped off cleanly above the free edge | Re-bonding / Builder Patch | Brush-on builder gel or resin glue |
| Broken Off at the Base | Extension completely lost; natural nail exposed | Rebuilding Structure | Builder gel with nail forms |
| Bleeding / Open Nail Bed | Break tore through the natural nail bed | Medical Care First | Antiseptic + bandage (Do NOT apply glue) |
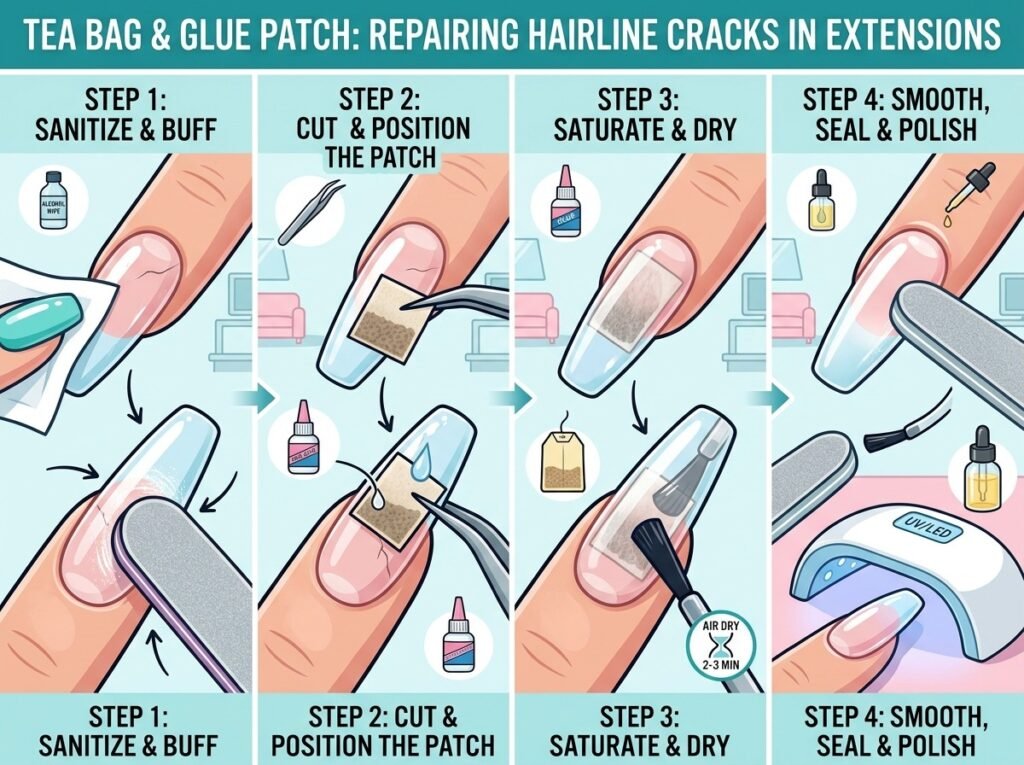
Step-by-Step Fix: The Tea Bag & Glue Patch (Hairline Cracks)
For cracks that haven’t detached completely, a tea bag or silk wrap patch creates a strong mesh bridge that holds the extension until your next fill:
- Sanitize & Buff the Cracked Area:
Removes surface shine and oil so adhesive bonds strongly. Wipe the broken nail with isopropyl alcohol to remove surface oils and dust. Gently buff the shiny topcoat off the cracked area using a fine-grit buffer (240-grit) to create a rough texture for adhesion.
2. Cut & Position the Patch:
Reinforces the weak stress arch with lightweight fiber mesh. Cut a tiny piece of a paper tea bag or silk wrap slightly larger than the crack. Apply a thin drop of professional nail glue over the crack and place the patch directly over it using tweezers, pressing it flat.
- Saturate with Glue & Let Dry:
Fuses the fiber patch to the extension material. Apply a second thin coat of nail glue over the patch, allowing the paper or silk to become completely translucent. Let it air dry completely for 2 to 3 minutes.
4. Smooth, Seal & Polish:
Blend the patch smoothly into the rest of the nail extension. Once dry, gently buff the edges of the patch until it sits flush with the rest of the extension. Sweep away dust, apply a shiny top coat (or gel topcoat cured under UV/LED), and finish with nourishing cuticle oil.
Fixing a Complete Break with Builder Gel
If the extension broke off entirely but your natural nail is intact, use builder gel to structure a new tip:
- Prep the natural nail: File away any leftover extension material clinging to the edges. Lightly buff the natural nail plate and apply a dehydrator/primer.
- Apply a nail form: Slide a paper nail form tightly under the free edge of your natural nail, securing the side wings around your finger.
- Sculpt the bridge: Brush a layer of builder gel over the natural nail, extending it onto the form to match the length of your other nails.
- Cure and shape: Cure under a UV/LED lamp for 60 seconds. Peel away the paper form, file the sides and tip into shape, and finish with gel polish.
Essential Safety Rules to Avoid Damage
- Never glue an open wound: If the break tore your natural nail bed and bled, do not apply nail glue, gel, or acrylic. Seal it with a bandage and let it heal completely to prevent severe infections.
- Avoid superglue (cyanoacrylate household glue): Household superglues contain harsh chemical additives not approved for skin or nail contact, which can cause chemical burns and brittle nail degradation.
- Don’t force lifted edges down: Prying or flooding lifted acrylic/gel edges with glue traps moisture underneath, creating a dark, damp environment for green “nail fungus” (Pseudomonas) to thrive.